
The kitchen work triangle connects your sink, stove, and refrigerator in a layout that keeps your most-used zones within easy reach of each other. Get this triangle right, and you’ll stop crisscrossing your kitchen mid-recipe, searching for a towel while a pot boils over. Get it wrong, and even a beautiful kitchen will feel exhausting to cook in.
This isn’t just a design trend it’s a practical system that’s been guiding kitchen layouts for decades because it mirrors how people actually move while cooking: gather ingredients, wash and prep, then cook. When those three points sit at sensible distances from each other, meal prep stops feeling like an obstacle course.
Below, we’ll break down exactly how to measure and plan your own kitchen triangle, what to do if your kitchen shape doesn’t cooperate, and a few modern adjustments worth considering if you cook with a partner or rely heavily on small appliances.
What Is the Kitchen Work Triangle and Why It Matters
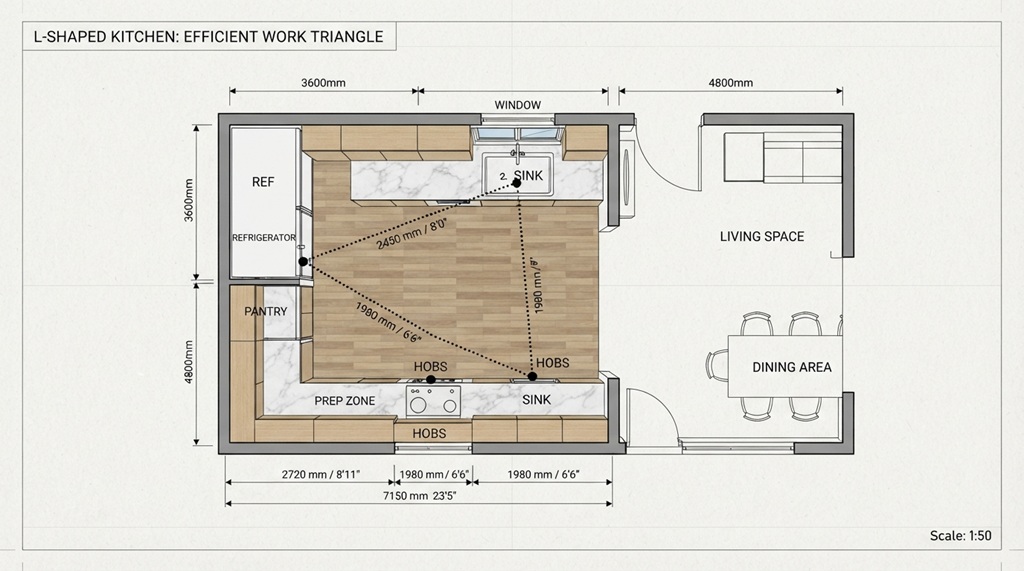
The kitchen work triangle is the imaginary line connecting your sink, stove, and refrigerator the three points you visit most while cooking. The idea is simple: the shorter and more balanced the distances between these three points, the less walking, backtracking, and fumbling you do during meal prep.
This concept isn’t new. It was developed by researchers studying kitchen efficiency, and it’s remained a go-to layout principle because the core logic still holds up: most cooking tasks involve moving between cold storage, water, and heat, in that general order. When those three points are scattered too far apart, you waste time and energy on every single meal. When they’re crammed too close together, you end up bumping into things or crowding whoever else is in the kitchen with you.
A well-planned triangle isn’t about a rigid geometric shape it’s about minimizing unnecessary movement while still giving each zone (prep, wash, cook) enough breathing room to function independently.
Ideal Measurements for Each Side of the Triangle
Each leg of the triangle should generally fall between 4 and 9 feet, with the total perimeter (all three sides added together) landing somewhere between 13 and 26 feet. These ranges aren’t arbitrary they’re based on comfortable walking distances that avoid both cramped and overly spread-out kitchens.
Why the Minimum Distance Matters
If any two points sit closer than 4 feet apart, you’ll likely deal with cabinets, appliance doors, or people bumping into each other constantly. A refrigerator door swinging open right next to your stove, for example, creates a collision risk every time someone’s cooking and someone else wants a snack.
Why the Maximum Distance Matters
If a leg stretches beyond 9 feet, you’re adding real steps to every single task. Over the course of preparing one meal, those extra steps add up industry experts in kitchen design often point to this as one of the biggest hidden causes of “why does cooking here feel so tiring” complaints, even in large, expensive kitchens.
Designing an Uninterrupted Workflow for Peak Cooking Efficiency
Ideally, high-traffic thoroughfares such as walkways leading to a dining room or adjoining exterior doorways should never dissect your primary work triangle. When household foot traffic constantly cuts through your culinary workspace, it disrupts your momentum, creates unnecessary safety hazards, and transforms simple meal prep into a frustrating obstacle course. Maintaining a seamless cooking routine relies on an intuitive, unobstructed floor plan. However, because these high-activity zones near your stove and prep counters endure heavy daily use, they naturally accumulate stubborn grime over time; to ensure your workspace remains as pristine as it is functional, remove tough grease from kitchen cabinets fast before finalizing your kitchen layout.
Step-by-Step: How to Plan Your Own Kitchen Triangle Layout
Start by measuring your current or planned locations for the sink, stove, and refrigerator, then check whether those three legs fall within the ideal range before making any layout decisions.
Step 1: Sketch your kitchen’s footprint.
Draw a simple overhead view of your kitchen, including doors, windows, and any fixed features like support columns or vents that can’t move.
Step 2: Mark your three anchor points.
Place the sink, stove, and refrigerator on your sketch either where they currently sit or where you’re considering installing them.
Step 3: Measure each leg of the triangle.
Measure from the center-front of each appliance to the center-front of the next. Check each measurement against the 4–9 foot range.
Step 4: Add up the perimeter.
Total all three legs. If you’re landing outside the 13–26 foot range, you’ll likely want to adjust at least one point.
Step 5: Check for obstructions.
Look at your sketch again and confirm no walkway or door swing cuts directly across any leg of the triangle.
Step 6: Adjust and re-measure.
If any leg is too short, too long, or blocked, shift one point and re-measure. This is far cheaper to fix on paper than after installation.
Common Kitchen Shapes and How the Triangle Fits Each One
Not every kitchen shape naturally supports a clean triangle, but each common layout has a workable approach.
Galley Kitchens
In a galley kitchen, appliances typically line up along two parallel walls, which naturally creates a compact, efficient triangle. The main challenge is keeping the walkway between the two counters clear aim for at least 42 inches of clearance so two people can pass without collision.
L-Shaped Kitchens
L-shaped kitchens tend to work well for the triangle because the two walls naturally separate zones while keeping everything within a short walk. Place the sink at the corner or center of one wall, with the stove and refrigerator anchoring the ends, so no single leg gets too long.
U-Shaped Kitchens
U-shaped kitchens often have the most natural fit for the triangle, since three walls can each host one point without forcing awkward diagonal walking paths. Just be careful the triangle doesn’t end up too small if the kitchen itself is compact you still want at least 4 feet between each point.
Open-Concept and Island Kitchens
Open-concept kitchens with islands can stretch the triangle too wide if the island isn’t factored in early. Many modern layouts place the sink or stove on the island itself, which shortens the distance to the remaining points and keeps the cook facing the rest of the room.
A Modern Adjustment: Planning for Multiple Cooks and Small Appliances

Here’s an angle most triangle guides skip entirely: the classic triangle assumes one person cooking alone, but a lot of households now have two people prepping at once, plus small appliances that function as their own micro-stations.
If you regularly cook with a partner, roommate, or kids helping out, consider the triangle as a starting framework rather than a fixed rule, then add a secondary “zone” for whoever’s doing prep work simultaneously like a second cutting board area near the sink that doesn’t force both cooks to cross paths. Similarly, appliances like slow cookers, air fryers, and coffee makers have become semi-permanent counter fixtures in many kitchens, and they effectively create a fourth work point. If your air fryer or coffee station sits far from all three triangle points, you’re adding extra trips that the original triangle concept never accounted for. When planning your layout, it’s worth walking through your actual weekly cooking routine not just the three core appliances to see where these small but frequent stops fall.
Layout Tweaks If Your Kitchen Doesn’t Allow a Perfect Triangle
If your kitchen’s shape or existing plumbing and electrical don’t allow a textbook triangle, focus on shortening the distance between your two most-used points instead of forcing a perfect shape. For most home cooks, that’s the sink and stove the pair you move between most during actual cooking, not just storage retrieval.
Small kitchens, narrow layouts, and kitchens with fixed plumbing (where moving the sink isn’t realistic) are the most common reasons a perfect triangle isn’t achievable. In these cases, prioritize keeping the sink-to-stove distance short, since that’s the leg used most frequently during active cooking rinsing vegetables, draining pasta, filling pots. The refrigerator leg can afford to be slightly longer since fridge trips tend to be less frequent mid-task.
Frequently Asked Questions
What is the ideal size for a kitchen work triangle?
Each side should generally measure between 4 and 9 feet, with a total perimeter between 13 and 26 feet. This range keeps the space efficient without feeling cramped or requiring excessive walking.
Does the kitchen triangle rule still apply to modern open-concept kitchens?
Yes, though it’s often adapted rather than followed exactly, especially with islands involved. Many modern kitchens place one triangle point on the island itself to keep the layout compact despite the open floor plan.
Can I have a kitchen triangle with two cooks?
The classic triangle assumes a single cook, so with two people, it helps to add a secondary prep zone outside the main triangle path. This prevents both cooks from constantly crossing the same walkway while working.
What if my kitchen is too small for a full triangle?
Focus on minimizing the distance between your sink and stove first, since that’s the most frequently used leg during actual cooking. A slightly longer refrigerator distance is less disruptive than a cramped or awkward sink-to-stove path.
Should walkways or doorways ever cross through the triangle?
Ideally, no major traffic path should cut directly through your work triangle. Foot traffic crossing your cooking zone creates safety hazards and interrupts your workflow during meal prep.
Conclusion
A well-planned kitchen triangle comes down to keeping your sink, stove, and refrigerator within comfortable, obstruction-free distances of each other generally 4 to 9 feet per leg. Whether you’re working with a galley kitchen, an L-shape, or an open-concept layout with an island, the same core principle applies: minimize unnecessary steps so your kitchen supports how you actually cook. If a perfect triangle isn’t possible in your space, prioritizing the sink-to-stove distance and accounting for how you really use your kitchen including extra cooks and small appliances will get you most of the efficiency benefits without a full renovation.
